> For the complete documentation index, see [llms.txt](https://ghostwritten.gitbook.io/git-in-action/llms.txt). Markdown versions of documentation pages are available by appending `.md` to page URLs; this page is available as [Markdown](https://ghostwritten.gitbook.io/git-in-action/github/3_github_action.md).
# 3 Github Action
***
参考链接:
***
### 1. 简介
[GitHub Actions](https://docs.github.com/cn/actions/quickstart) 是 GitHub 的持续集成服务,于2018年10月推出。
`GitHub Actions` 帮助您自动完成软件开发周期内的任务。 `GitHub Actions` 是事件驱动的,意味着您可以在指定事件发生后运行一系列命令。
工作流程是您添加到仓库的自动化过程。 工作流程由一项或多项作业组成,可以计划或由事件触发。 工作流程可用于在 GitHub 上构建、测试、打包、发布或部署项目。
[GitHub 官方市场](https://github.com/marketplace?type=actions),我们除了自己编写`action`,也可以借用别人的。
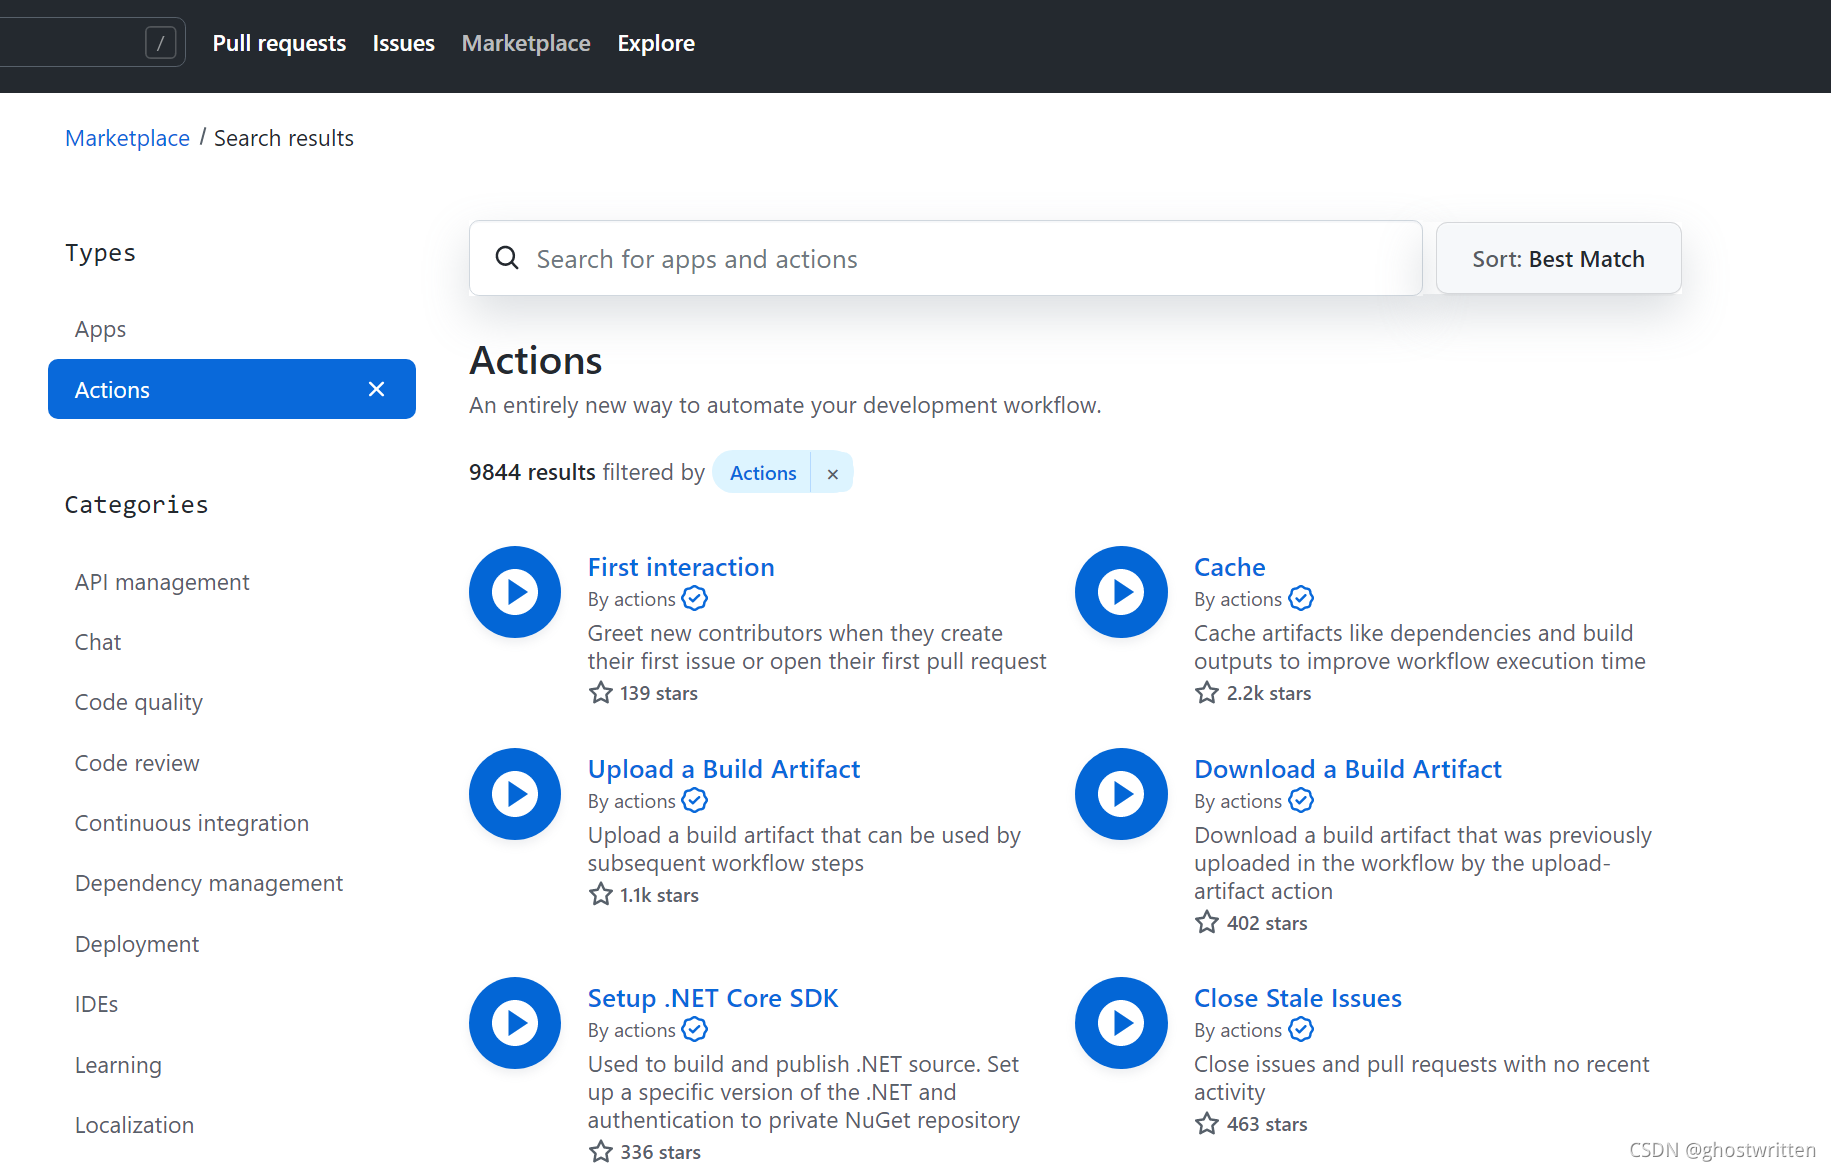
每个 action 就是一个独立脚本,因此可以做成代码仓库,使用`userName/repoName`的语法引用 `action`。比如,`actions/setup-node`就表示`github.com/actions/setup-node`这个仓库,它代表一个 `action`,作用是安装 `Node.js`。事实上,GitHub 官方的 `actions` 都放在 `github.com/actions` 里面。
actions 也有版本的概念,下面都是合法的 action 引用,用的就是 Git 的指针概念,详见[官方文档](https://docs.github.com/en/actions/creating-actions/about-actions#versioning-your-action)。
```bash
actions/setup-node@74bc508 # 指向一个 commit
actions/setup-node@v1.0 # 指向一个标签
actions/setup-node@master # 指向一个分支
```
### 2. 基础概念
1. `workflow` (工作流程):持续集成一次运行的过程,就是一个 workflow。
2. `job` (任务):一个 `workflow` 由一个或多个 `jobs` 构成,含义是一次持续集成的运行,可以完成多个任务;
3. `step`(步骤):每个 `job` 由多个 `step` 构成,一步步完成。
4. `action` (动作):每个 `step` 可以依次执行一个或多个命令(action)。
`GitHub Actions` 为每个任务 (job) 都提供了一个虚拟机来执行,每台虚拟机都有相同的硬件资源:
* 2-core CPU
* 7 GB RAM 内存
* 14 GB SSD 硬盘空间
使用限制:
* 每个仓库只能同时支持20个 workflow 并行。
* 每小时可以调用1000次 GitHub API 。
* 每个 job 最多可以执行6个小时。
* 免费版的用户最大支持20个 job 并发执行,macOS 最大只支持5个。
* 私有仓库每月累计使用时间为2000分钟,超过后$ 0.008/分钟,公共仓库则无限制。
操作系统方面可选择 Windows server、Linux、macOS,并预装了大量软件包和工具。 虽然名称叫持续集成,但当所有任务终止和完成时,虚拟环境内的数据会随之清空,并不会持续。即每个新任务都是一个全新的虚拟环境。
### 3. workflow 文件
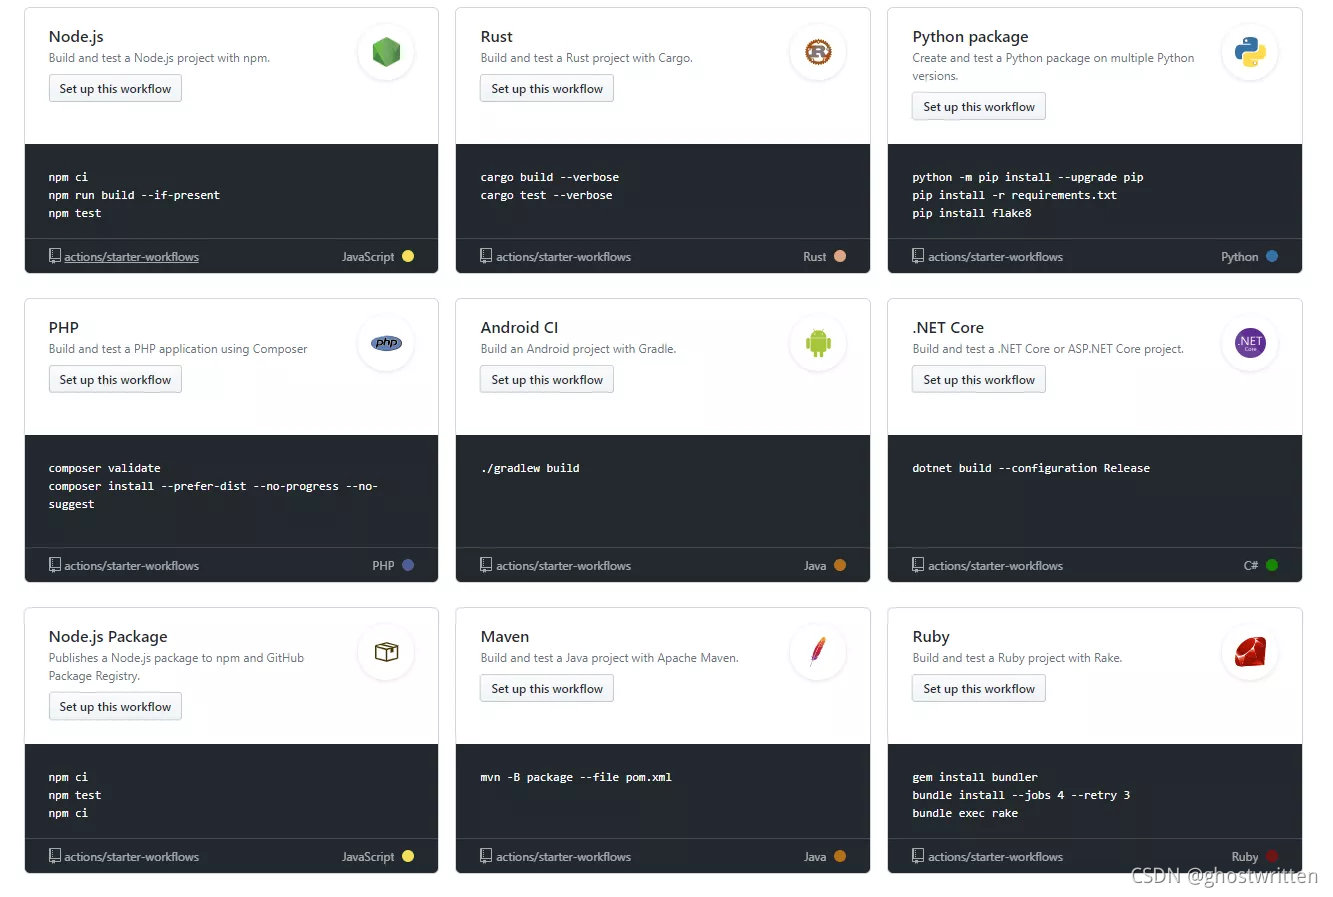
`GitHub Actions` 的配置文件叫做 `workflow` 文件(官方中文翻译为 “工作流程文件”),存放在代码仓库的`.github/workflows` 目录中。`workflow` 文件采用 `YAML` 格式,文件名可以任意取,但是后缀名统一为`.yml`,比如 `p3terx.yml`。一个库可以有多个 `workflow` 文件,GitHub 只要发现`.github/workflows` 目录里面有`.yml` 文件,就会按照文件中所指定的触发条件在符合条件时自动运行该文件中的工作流程。在 Actions 页面可以看到很多种语言的 `workflow` 文件的模版,可以用于简单的构建与测试。
 workflow 文件的配置字段非常多,详见[官方文档](https://docs.github.com/cn/actions)。下面是一些基本字段。
```bash
#name字段是 workflow 的名称。如果省略该字段,默认为当前 workflow 的文件名。
name: GitHub Actions Demo
```
#### 3.1 触发事件
```bash
#push事件触发 workflow。
on: push
#on字段也可以是事件的数组。`push`事件或`pull_request`事件都可以触发 `workflow`。
on: [push, pull_request]
```
```bash
#只有`master`分支发生`push`事件时,才会触发 workflow
on:
push:
branches:
- master
```
```bash
#push tag 时触发
on:
push:
tags:
- 'v*'
#发布 release 触发
on:
release:
types: [published]
定时触发
on:
schedule:
- cron: '0 * * * *'
```
#### 3.2 job任务
`workflow` 文件的主体是`jobs`字段,表示要执行的一项或多项任务。 `jobs`字段里面,需要写出每一项任务的`job_id`,具体名称自定义。`job_id`里面的`name`字段是任务的说明。
```bash
#job_id分别是my_first_job和my_second_job
jobs:
my_first_job:
name: My first job
my_second_job:
name: My second job
```
```bash
#`needs`字段指定当前任务的依赖关系,即运行顺序。`job1`必须先于job2完成,而job3等待`job1`和`job2`的完成才能运行
#因此,这个 workflow 的运行顺序依次为:`job1、job2、job3`。
jobs:
job1:
job2:
needs: job1
job3:
needs: [job1, job2]
```
#### 3.3 运行主机环境
`runs-on`字段指定运行所需要的虚拟机环境。它是必填字段。目前可用的虚拟机如下。
```bash
ubuntu-latest,ubuntu-18.04或ubuntu-16.04
windows-latest,windows-2019或windows-2016
macOS-latest或macOS-10.14
```
```bash
runs-on: ubuntu-18.04
```
#### 3.4 运行步骤
```bash
#`steps`字段指定每个 `Job` 的运行步骤,可以包含一个或多个步骤。每个步骤都可以指定以下三个字段。
jobs..steps.name:步骤名称。
jobs..steps.run:该步骤运行的命令或者 action。
jobs..steps.env:该步骤所需的环境变量。
```
```bash
steps:
- uses: actions/setup-node@74bc508 # Reference a specific commit
- uses: actions/setup-node@v1 # Reference the major version of a release
- uses: actions/setup-node@v1.2 # Reference a minor version of a release
- uses: actions/setup-node@master # Reference a branch
```
示例:
```bash
jobs:
build:
# Job name is Greeting
name: Greeting
# This job runs on Linux
runs-on: ubuntu-latest
steps:
# This step uses GitHub's hello-world-javascript-action: https://github.com/actions/hello-world-javascript-action
- name: Hello world
uses: actions/hello-world-javascript-action@v1
with:
who-to-greet: 'Mona the Octocat'
id: hello
# This step prints an output (time) from the previous step's action.
- name: Echo the greeting's time
run: echo 'The time was ${{ steps.hello.outputs.time }}.'
```
#### 3.5 引用action
```bash
#public repo
{owner}/{repo}@{ref} or {owner}/{repo}/{path}@{ref}.
#same repo
{owner}/{repo}@{ref} or ./path/to/dir
|-- hello-world (repository)
| |__ .github
| └── workflows
| └── my-first-workflow.yml
| └── actions
| |__ hello-world-action
| └── action.yml
jobs:
build:
runs-on: ubuntu-latest
steps:
# This step checks out a copy of your repository.
- uses: actions/checkout@v1
# This step references the directory that contains the action.
- uses: ../github/actions/hello-world-action
#docker container
docker://{image}:{tag}
示例:
jobs:
my_first_job:
steps:
- name: My first step
uses: docker://gcr.io/cloud-builders/gradle
- name: Install Dependencies
run: npm install
shell: bash
```
#### 3.6 显示workflow status
```bash

```
#### 3.7 with传参
`firstname` ,会被转化为`INPUTFIRST_NAME`使用
```bash
jobs:
my_first_job:
steps:
- name: My first step
uses: actions/hello_world@master
with:
first_name: Mona
middle_name: The
last_name: Octocat
```
#### 3.8 env环境变量
```bash
steps:
- name: Hello world
run: echo Hello world $FIRST_NAME $middle_name $Last_Name!
env:
FIRST_NAME: Mona
middle_name: The
Last_Name: Octocat
```
#### 3.9 secrets引用
```bash
steps:
- name: My first action
env:
GITHUB_TOKEN: ${{ secrets.GITHUB_TOKEN }}
FIRST_NAME: Mona
LAST_NAME: Octocat
steps:
- name: Hello world action
with: # Set the secret as an input
super_secret: ${{ secrets.SuperSecret }}
env: # Or as an environment variable
super_secret: ${{ secrets.SuperSecret }}
```
#### 3.10 action/checkout检查
最新版本特性:
* **提高性能** 默认情况下只获取一个提交
* **脚本验证的 git 命令** 身份验证令牌保留在本地 git 配置中
* **支持SSH**
* 创建本地分支 检出分支时不再分离 HEAD
* **改进的布局** 输入path总是相对于 $GITHUB\_WORKSPACE 与容器操作更好地对齐,其中 $GITHUB\_WORKSPACE 被映射到
* **回退到 REST API 下载** 当 PATH 中没有 Git 2.18 或更高版本时,将使用 REST API 下载文件 使用作业容器时,使用容器的 PATH
### 4. 获取token
根据[GitHub提供的文档生成密钥](https://docs.github.com/cn/github/authenticating-to-github/keeping-your-account-and-data-secure/creating-a-personal-access-token),生成好后记得复制下来,要不然再访问页面的时候密钥就不展示了。
```bash
# 生成密钥时主要需要开启的权限有
1、rope 下所有权限
2、admin:repo_hook 下所有权限
3、delete_repo 下所有权限
# 主要是关于rope的权限,尽量都开启
```
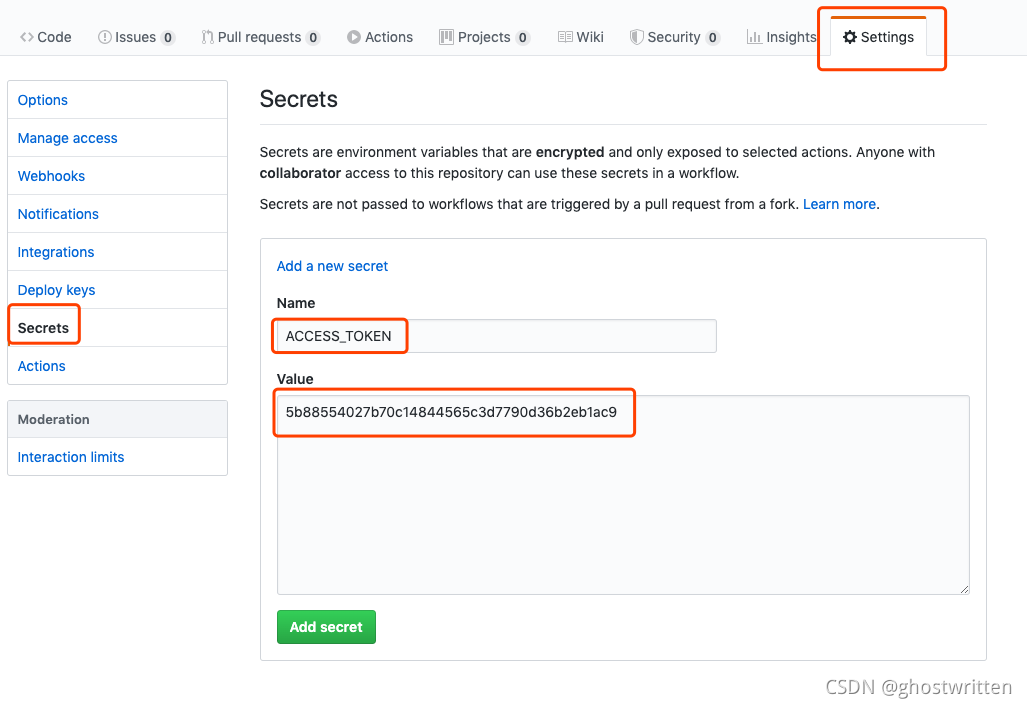
要使用`Actions`功能的仓库的`Settings`中的`Secrets`中新增一条
```bash
Name为:ACCESS_TOKEN
Value为:刚才生成好的密钥
```
### 5. 示例
#### 5.1 一条命令的action
下面是一个完整的 `workflow` 文件的范例。
```bash
name: Greeting from Mona
on: push
jobs:
my-job:
name: My Job
runs-on: ubuntu-latest
steps:
- name: Print a greeting
env:
MY_VAR: Hi there! My name is
FIRST_NAME: Mona
MIDDLE_NAME: The
LAST_NAME: Octocat
run: |
echo $MY_VAR $FIRST_NAME $MIDDLE_NAME $LAST_NAME.
```
示例文件运行截图: 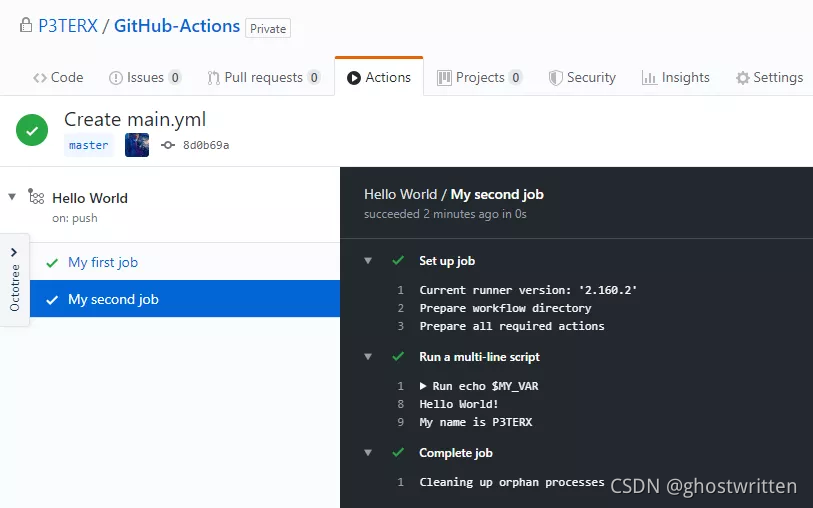
#### 5.2 React 项目发布到 GitHub Pages
下面是一个实例,通过 `GitHub Actions` 构建一个 `React` 项目,并发布到 GitHub Pages。最终代码都在这个[仓库](https://github.com/ghostwritten/github-actions-demo)里面,发布后的参考网址为`ghostwritten.github.io/github-actions-demo`
第一步:这个示例需要将构建成果发到 GitHub 仓库,因此需要 GitHub 密钥。按照官方文档,生成一个密钥。然后,将这个密钥储存到当前仓库的`Settings/Secrets`里面。 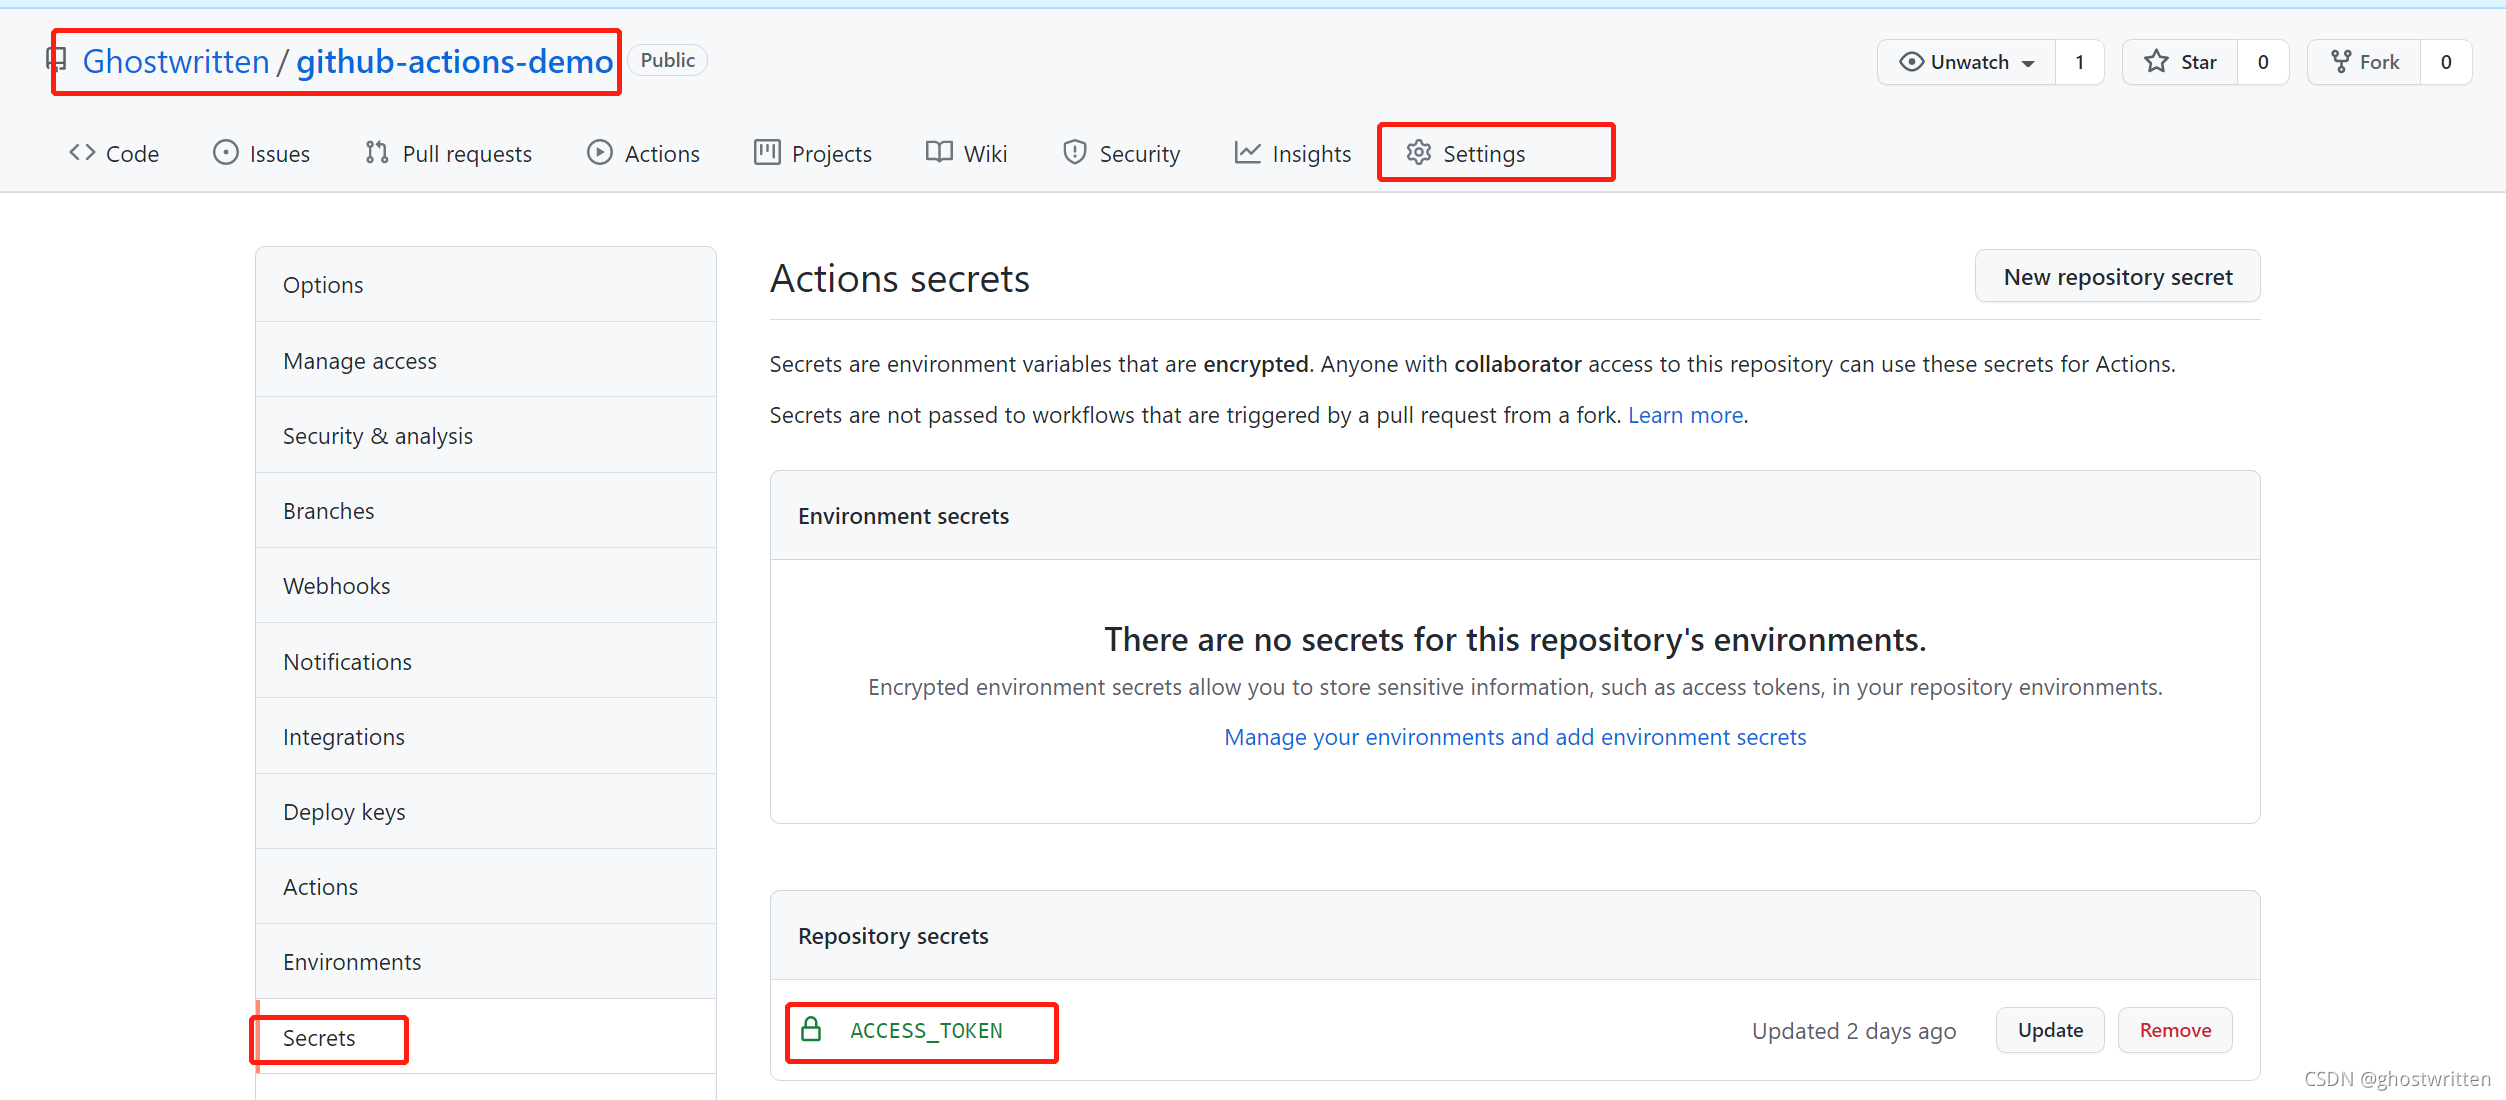
上图是储存秘密的环境变量的地方。环境变量的名字可以随便起,这里用的是`ACCESS_TOKEN`。如果你不用这个名字,后面脚本里的变量名也要跟着改。
第二步:本地计算机使用[create-react-app](https://github.com/facebook/create-react-app),生成一个标准的 React 应用。
```bash
$ npx create-react-app github-actions-demo
$ cd github-actions-demo
```
然后,打开`package.json`文件,加一个`homepage`字段,表示该应用发布后的根目录(参见[官方文档](https://create-react-app.dev/docs/deployment/#building-for-relative-paths))。
```bash
"homepage": "https://[username].github.io/github-actions-demo",
```
上面代码中,将\[username]替换成你的 GitHub 用户名,参见[范例](https://github.com/ghostwritten/github-actions-demo/blob/master/package.json#L14)。
第三步,在这个仓库的`.github/workflows`目录,生成一个 `workflow` 文件,名字可以随便取,这个示例是`ci.yml`。
别人的 action:[JamesIves/github-pages-deploy-action](https://github.com/marketplace/actions/deploy-to-github-pages)
```bash
name: Build and Deploy
on:
push:
branches:
- master
jobs:
build-and-deploy:
runs-on: ubuntu-latest
steps:
- name: Checkout ������️
uses: actions/checkout@v1
- name: Build and Deploy
uses: JamesIves/github-pages-deploy-action@releases/v2
env:
ACCESS_TOKEN: ${{ secrets.ACCESS_TOKEN }} ## GitHub 密钥 ACCESS_TOKEN 是在第二步Settings的Secrets中新增时定义的Name,要保持一致
BASE_BRANCH: master # The branch the action should deploy from.
BRANCH: gh-pages # The branch the action should deploy to.
FOLDER: build # The folder the action should deploy.
BUILD_SCRIPT: npm install && npm run-script build # The build script the action should run prior to deploying.
```
上面这个 workflow 文件的要点如下。
* 整个流程在master分支发生push事件时触发。
* 只有一个job,运行在虚拟机环境ubuntu-latest。
* 第一步是获取源码,使用的 action 是`actions/checkout`。
* 第二步是构建和部署,使用的 action 是`JamesIves/github-pages-deploy-action`。
* 第二步需要四个环境变量,分别为 GitHub 密钥、发布分支、构建成果所在目录、构建脚本。其中,只有 GitHub密钥是秘密变量,需要写在双括号里面,其他三个都可以直接写在文件里。
第五步,保存上面的文件后,将整个仓库推送到 GitHub。GitHub 发现了 workflow 文件以后,就会自动运行。你可以在网站上实时查看运行日志,日志默认保存30天。 
等到 workflow 运行结束,访问 GitHub Page,即`https://ghostwritten.github.io/github-actions-demo`,会看到构建成果已经发上网了。如果你想知道如何利用github搭建一个博客,[请参考](https://ghostwritten.blog.csdn.net/article/details/107010306)。因为我的博客域名为`smoothies.com.cn`,当访问`ghostwritten.github.io`会自动跳转`smoothies.com.cn`。 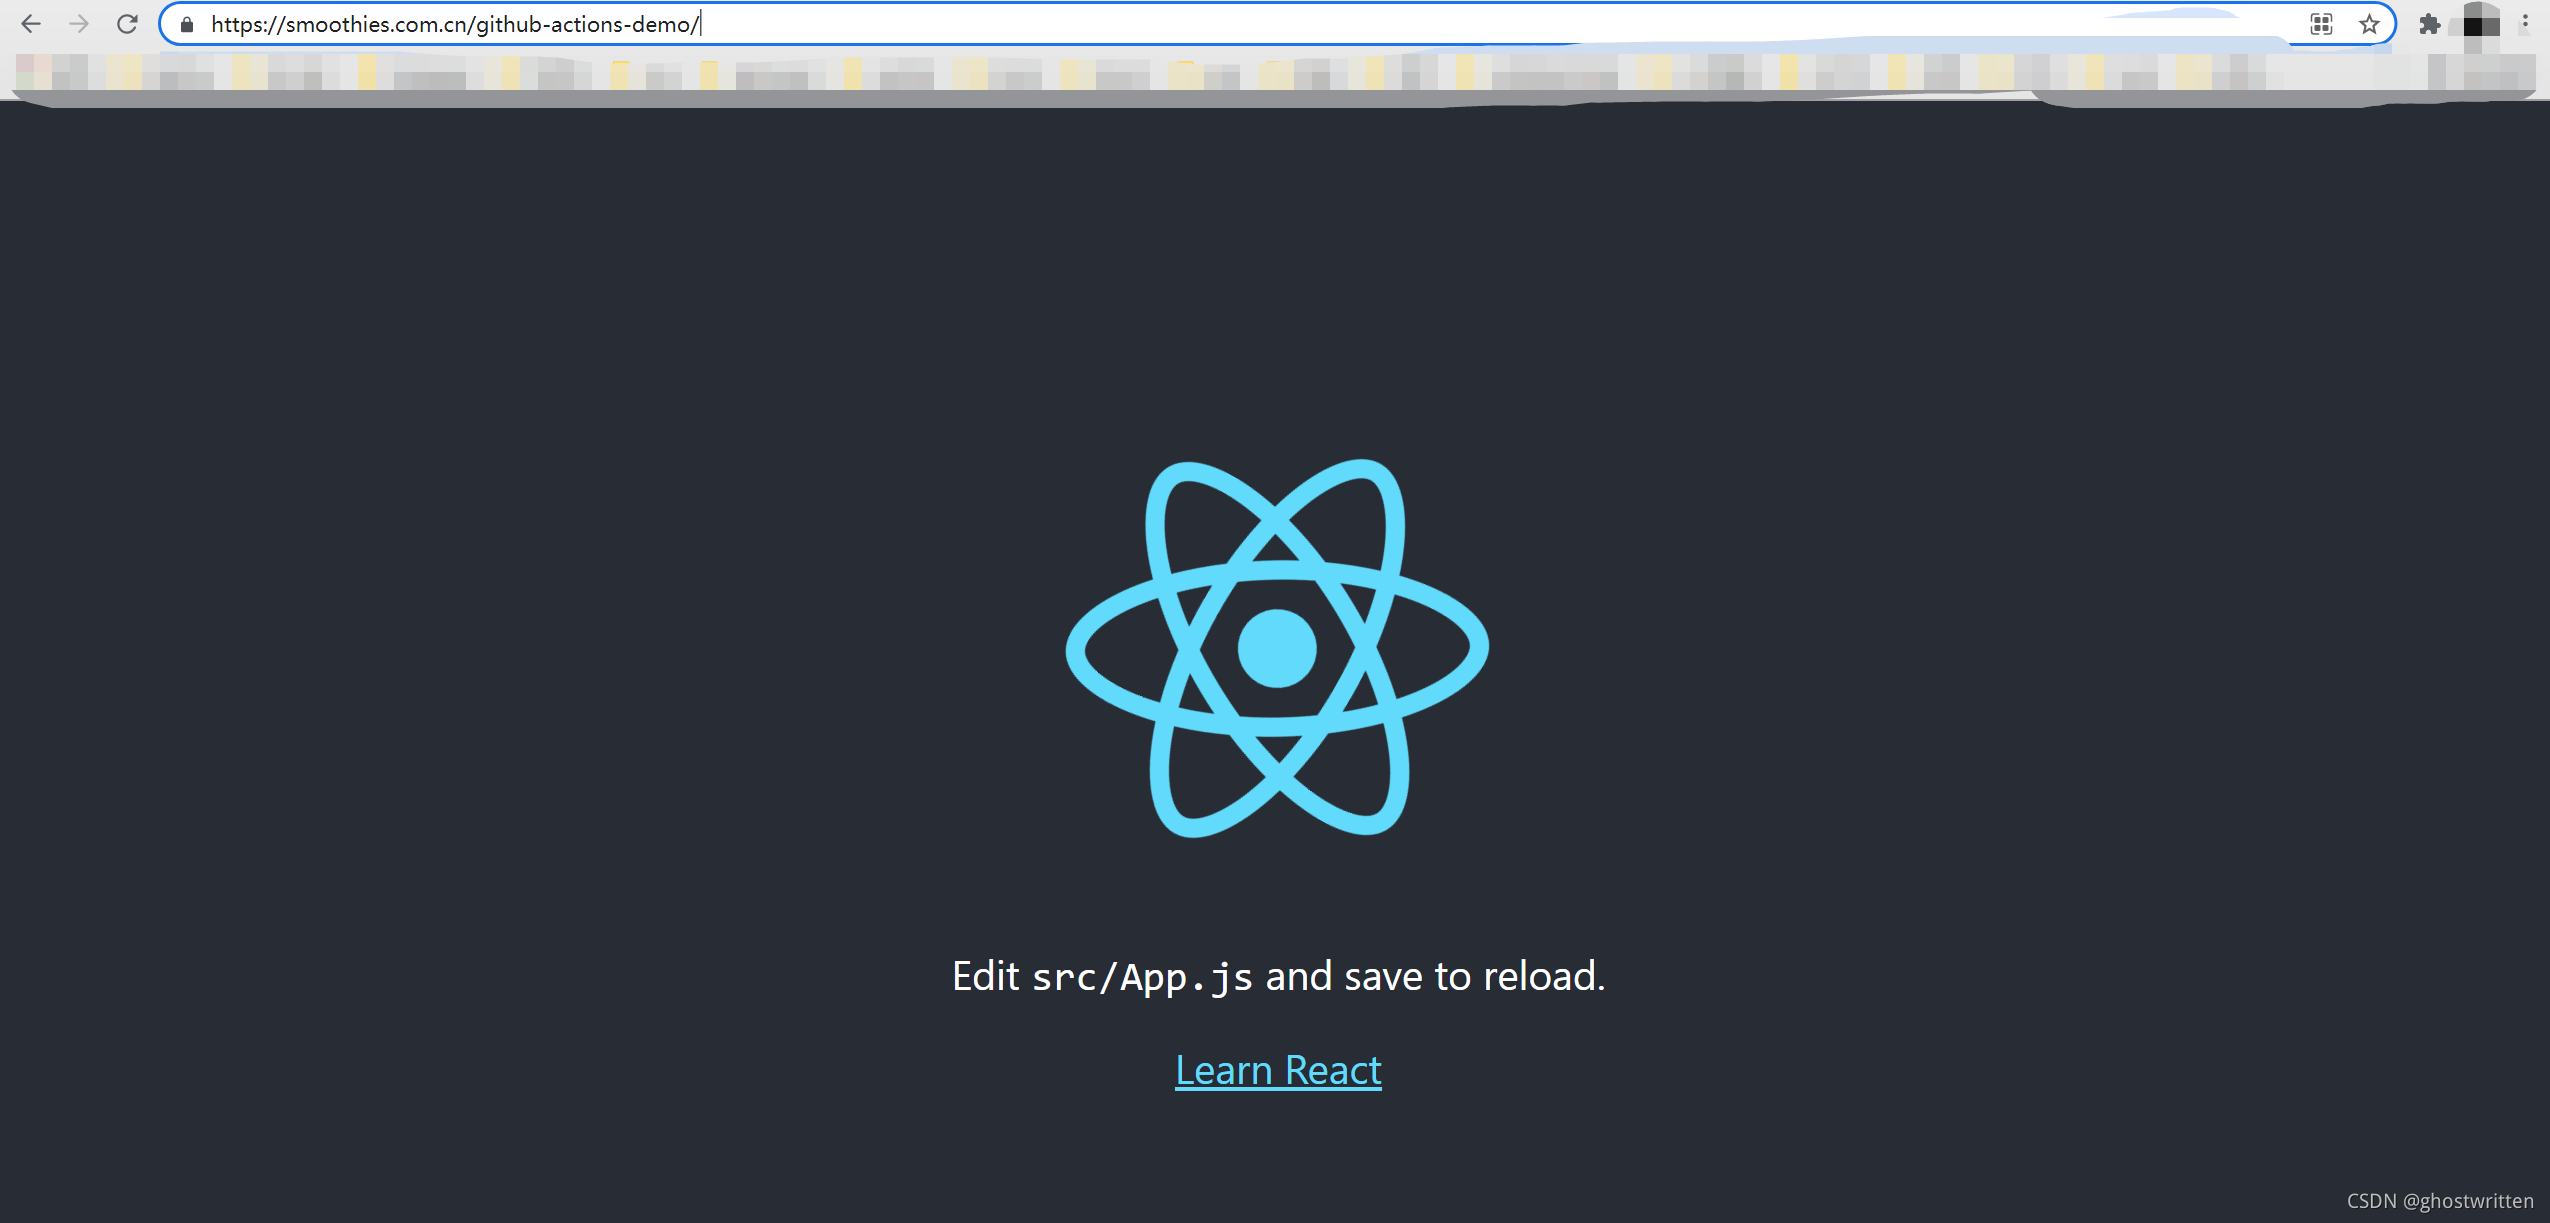
以后,每次修改后推送源码,`GitHub Actions` 都会自动运行,将构建产物发布到网页。